


Device characterization and validation often require more than one instrument to fully qualify your design. You may need an oscilloscope, spectrum analyzer, digital filters, and other instruments to verify the device or component. While flexible, FPGA-based solutions like Moku can solve this challenge by consolidating many software-defined instruments into a single device, you may need to increase channel count or the number of instruments you can use simultaneously. Using APIs for industry-standard programs like LabVIEW, it’s easy to automate and streamline this test configuration for repeated, controlled validation.
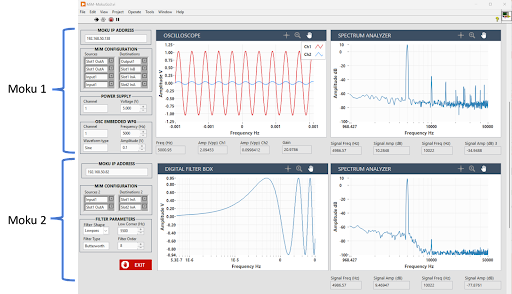
 Using LabVIEW, we created a graphical user interface (GUI) to display multiple instrument graphs and measurements simultaneously, from multiple software-defined instruments and two Moku:Go devices, including configuration parameters and settings (Figure 3). The signal routing between instrument slots and the analog inputs and outputs can be found on the left side of the GUI. The first Moku:Go provides power and the input signal to the DUT. It simultaneously characterizes the DUT output signal in the time and frequency domains. The second Moku:Go employs the Digital Filter Box to remove higher-order harmonics from the DUT output signal.
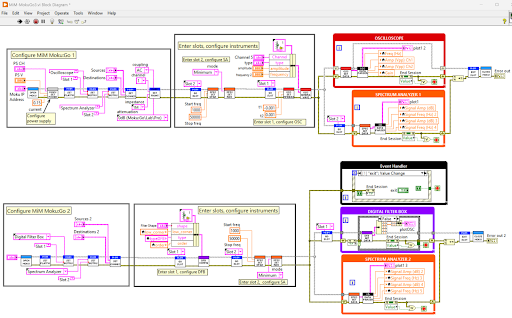
 The LabVIEW block diagram is shown in Figure 4. From left to right, we must start by configuring Multi-instrument Mode for the first Moku:Go device, then configure the instruments within each slot, and then repeat this process for the second device. This configuration allows us to run the blocks of code controlling all instruments in parallel, enabling a more streamlined and condensed test setup than integrating in multiple fixed-function hardware devices, often from a wide range of manufacturers.
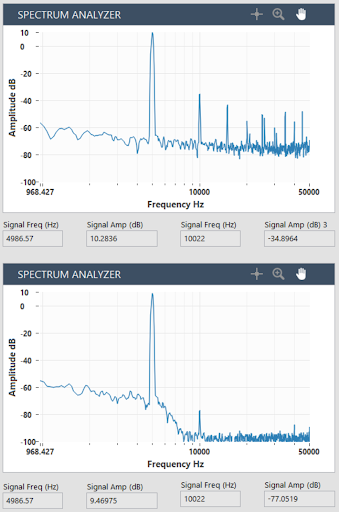
 This configuration, combined with the GUI, allows us to both stimulate the DUT and see the results in real time. For example, adjusting the gain setting potentiometer on the DUT would allow us to see the output signal change in real time on both the Oscilloscope and Spectrum Analyzer, alongside measurements for frequency, amplitude, and gain. Furthermore, by adjusting the Digital Filter Box parameters, we can create a real-time lowpass filter to remove higher-order harmonics in the DUT output signal, with results shown in Figure 5.
 Using LabVIEW to initiate real-time control and signal processing on Moku devices enables a much better way to view data and adjust settings while performing repetitive device validation.
Configuring the setup
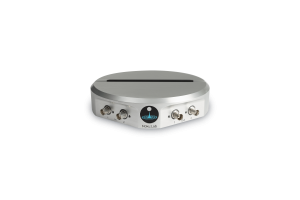
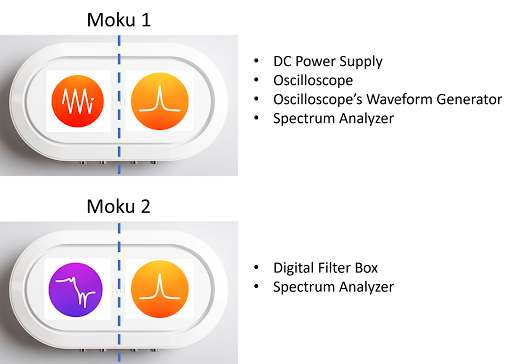
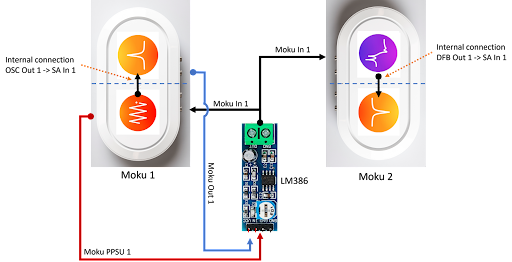
Multi-instrument Mode is a feature available on Moku devices that enables you to deploy up to four software-defined instruments simultaneously through partial FPGA reconfiguration. Specifically with Moku:Go, you can deploy two instruments at once. If more flexibility is required, the LabVIEW API is available to help you to control multiple Moku devices simultaneously from a single software interface. For this example, we are using two Moku:Go devices. This approach allows us to collect data from multiple individual instruments on each device simultaneously. We can then use the LabVIEW API to control both devices and all instruments from one interface. In this experiment, our device under test (DUT) is a Texas Instruments LM386 Low Voltage Audio Power Amplifier. For validation, we first use the programmable DC power supply on the first Moku:Go device to power the DUT. Next, we apply a stimulus with the Oscilloscope’s embedded Waveform Generator. Then, we compare the input signal to the DUT output signal, and use the Oscilloscope data to calculate a gain factor. Simultaneously on the second Moku:Go device, we use the Spectrum Analyzer to examine the DUT output signal in the frequency domain, and use the Digital Filter Box to remove higher-order harmonics in the DUT output signal. In the first Moku:Go, we can configure Slot 1 as the Oscilloscope and Slot 2 as the Spectrum Analyzer. In the second Moku:Go, we can deploy the Digital Filter Box in Slot 1 and the Spectrum Analyzer in Slot 2. We also leverage the Oscilloscope’s embedded Waveform Generator and the Moku device’s programmable power supply, allowing us to essentially deploy six instruments simultaneously through two Moku:Go devices (Figure 1). Figure 2 depicts the wiring diagram of the test setup.
Figure 1: The instrument configurations for both Moku:Go devices.
Figure 2: Test setup block diagram between the Oscilloscope (OSC), Spectrum Analyzer (SA), Digital Filter Box (DFB), and programmable power supply units (PPSU).
Figure 3: LabVIEW GUI with the first Moku:Go graphs visible on top and the second Moku:Go graphs visible on the bottom.
Figure 4: LabVIEW block diagram detailing each instrument’s configuration settings.
Figure 5: The DUT output signal before lowpass filter (top) and after lowpass filter (bottom). Measurements are displayed for a 5 kHz fundamental and a 10 kHz second harmonic.